Posts filed under ‘Windows Tweaks’
eCopy Paperworks & Sharepoint Implementation
Hi Friends,
I am going around researching about Enterprise Document Management system & currently evaluating eCopy Paperworks.
It is a very good document management software which has lots of builtin connectors to source documents from different sources!
Check the official website: http://www.ecopy.com/Products-eCopy-PaperWorks.asp
The most interesting part of this software is the connector for Microsoft Sharepoint. Shareponit is probably implemented in most of the organizations as part of Intranet & eCopy Paperworks allows you to leverage existing Sharepoint platform for document management.
Red Sox have implemented eCopy Paperworks with Sharepoint & we have a video from Nuance explaining the details on You Tube:
Enjoy!
Keywords:
eCopy, PCDocs, Web Docs, Sharepoint, Microsoft, Red Sox, Paperworks, Enterprise Document Management, Paperless, Digital Document, Nuance, Scanner, Document Scan, eCopy Paperworks, etc.
Guide to Enable WPA2-PSK Support on Dlink DWL-G630 Wireless Card
Hi Friends,
If you are using DWL-G630 Wireless Card from Dlink, then you might have noted that it does not support WPA2-PSK Encryption.
I am talking of particular DWL-G630 Rev. D Card which are sold out here in India.
The driver that came along with the contents are v4.10 released in 2005 which are pretty old.
A quick search around google to find out the latest drivers from Dlink seems pretty painful task as there is no proper information available on Dlink Official Website.
Hence, i decided to crack this nut…as i did not want to lower my Wireless Router’s security encryption anything below WPA2-PSK just because of lame non-availability of driver!
First, in order to get latest drivers from Dlink; finally landed me to the Dlink’s Global US FTP Site, where dozens of driver zips are available.
You have to manually download & have a look if it will work for your card or not. Dont go for the filename to determine the driver model as it might support many cross cards.
You need to check the driver INF file post download to exactly determine which cards are supported.
DLink’s Global FTP Driver Site: ftp://ftp.dlink.com/Wireless/
Now, after downloading couple of files, the only latest driver post v4.10 was v4.1.2.725 released on 06/27/2007.
ftp://ftp.dlink.com/Wireless/dwlG630_revE/Drivers/dwlG630_revE_drivers_514.zip
If you install these drivers from Dlink, don’t expect it to support WPA2-PSK Encryption!!
Thus, the search for WPA2-PSK Support continued!!
Lets have a quick introduction over WPA2-PSK & its support on Microsoft Platform:
A very good article for Microsoft support can be read at:
http://www.microsoft.com/windowsxp/using/security/expert/bowman_wirelesssecurity.mspx
Note that you need XP Service Pack2 or the specific update in order to make sure that your OS Support’s WPA2-PSK Encryption.
If you are already on Windows XP Service Pack3…you are on track 😉
Two good articles to go over WPA2-PSK Encryption details:
http://technet.microsoft.com/en-us/library/bb878054.aspx
http://en.wikipedia.org/wiki/Wi-Fi_Protected_Access
So now to move ahead with our WPA2-PSK Support quest…i went around few articles which mentioned that the chipset used in DWL-G630 is manufactured by Atheros!
A quick search around points that Dlink DWL-G630 has AR5005 chipset. Now the catch out here is Atheros drivers support WPA2-PSK Encryption.
So finally after digging on the google, i got the below Atheros AR5005X chipset driver compatible for DWL-G630!
WPA2-PSK Supporting DWL-G630 Driver for Windows XP: http://www.filefactory.com/file/a1fcbea/n/atheros_ar5xxx_770406_xp.zip
Once i downloaded this & did an update driver, my Wireless card connected instantly to my Wireless Router Access Point!
If you are looking to configure this Card on Linux, then below is a good page on Ubuntu Forums for the same:
http://ubuntuforums.org/archive/index.php/t-176750.html
Finally a day along wait and precious R&D came to some useful conclusion.
I am not sure why DLink is not releasing an updated driver which would support the WPA2-PSK Encryption, but as long as we have a workaround we should not be complaining 😉
I hope this documentation seals up the issue for anyone else as i did not find a conclusive dedicated document on the internet for this issue.
Go Wireless >>>>>>>>>
Keywords: Wireless, Wireless NIC, Wireless Card, DWL-G630 Rev D, Dlink, WPA2, WPA, WPA2-PSK, Atheros 5005X, Atheros 5xxx, Driver, Wireless Driver, etc
Create Hidden Command Prompt/CMD/COMMAND Process
Hi friends,
Being a Java programmer, i always have a wish that while distributing my programs, instead of creating some setup, i could just distribute it in a JAR file & launch it via a batch file!
But a batch file, means a command prompt window keeps running side ways!
There began my search for a way to create a hidden command prompt process!
I came across two good solutions:
- Create Hidden Process (http://www.commandline.co.uk/chp/)
- NirCmd (http://www.nirsoft.net/utils/nircmd.html)
Create Hidden Process is an excellent freeware which allows you to launch almost anything from command prompt & that too completely hidden!
For example, i participate in BOINC Projects (SETI@Home & Climateprediction)
Running the BOINC GUI Module consumes lots of RAM & CPU…so i always prefer to launch it via Console!
But launching via console means, i have to keep a command prompt window open!
Using CHP, i can easily create a hidden command prompt process as follows:
###########################
bhide.bat – Example to launch boinc console using CHP (Create Hidden Process)
CHP cmd.exe /c “”d:\User Profiles\skatdare\boinc.bat””
exit
###########################
###########################
boinc.bat – Example to launch boinc console (sub-batch file call)
cd\
cd pro*
cd boinc
boinc
##############################
So download Create Hidden Process from here!
NirCmd is an advanced command line tool which allows us to do lots of things without showing any user interface.
More detailed documentation for NirCmd is available here..
Download NirCmd from here!
So enjoy Hiding command prompts 🙂
Keywords: batch file,batch file command,batch files,batch files command,batch files prompt,cmd,cmd command,cmd exe,cmd32,command exe,command prompt,command prompt commands,command promt,command windows xp,dos command,dos commands,dos prompt,j5,j7,j70,msdos prompt,windows 2000,command,windows command prompt,windows prompt,windows xp prompt,z5,z7
Creating SYSTEM Folders in Windows XP (con, prn, aux, etc)
Just curious around the working of Windows XP.. i found one interesting stuff!
Folders with name: CON, PRN, AUX, CLOCK$, NUL, COM1, COM2, COM3, COM4, COM5, COM6, COM7, COM8, COM9, LPT1, LPT2, LPT3, LPT4, LPT5, LPT6, LPT7, LPT8, & LPT9 cant be created using Windows Explorer or Command Prompt directly!
This is prevented as XP terms these folders as SYSTEM Folder Names reserved only for the Operating System..
But our curious brains dont stop pondering over such pessy stuff!
I searched around the net & found this trick to create system folders on XP through command prompt!
Try this:
CREATION
Syntax:md \\.\\$path
Example:prompt>md \\.\\C:\con
Explanation: This would create a folder named “con” on your “C Drive”
Similarly to delete such folder:
DELETION
Syntax:rd/s \\.\\$path
Example:prompt>rd/s \\.\\C:\con
Explanation: This would remove the folder named “con”!
Note: rd(Remove Directory) command is used with “/s” switch as otherwise it would give error that “folder is not empty”!
On another hand…if you ever wondered how to create a folder with no name…then try this:
Create a New Folder from Windows Explorer
Select rename & type: “ALT+255″(Use Numpad)..thats it!
ALT+255 stands for blank character in ASCII…so it still accepts your folder name!
Keywords: computer, file folders, information systems,network,operating systems,system,system 2000,system folder,system folders,system volume information folder,systems,technology,windows system folder,windows xp folders
INTEX / ZEBRONICS Fake RTC8139D/RTL8139D Lan Chipset Drivers
Continuing my further research on the low quality LAN/NIC cards available in India…
This new INTEX / ZEBRONICS card has chipsets printed saying RTC8139D or even RTL8139D….
But both these chipsets are fake…
The driver supplied with has to installed otherwise.. even Windows XP fails to autodetect and install it as a Realtek LAN Card…
The Drivers supplied are written by Silan MicroElectronics Inc, China (www.silan.com.cn)
I have tested both the cards from INTEX & ZEBRONICS with XP & SP2 and the drivers supplied worked well..
Here are those drivers which upon installation lists the LAN/NIC Card as Realtek 8139d Card..which is totally fake…
INTEX_NIC_Fake_RTL8139d.zip
Zebronics_NIC_Fake_RTL8139d.zip
Once again.. i would recommend everyone not to fall for these cards…due to low cost…
Go for standard companies like DLINK or INTEL..
Even Original Realtek Cards are available..but proper detection has to be done in order to confirm whether its original or not…
Original Realtek/Dlink/Intel based cards get automatically installed in Windows XP without any driver disk requirement…
Intex Drivers can be downloaded from (Link Updated: 23rd September 2009):
Intex Technologies
or i have uploaded the latest drivers available on website to:
8139D_RTC Based Chipset
8139D_RTL Based Chipset
TechCom Drivers can be downloaded from:
TechCom India
or i have uploaded the latest drivers available on website to:
8139dII_TechCom Chipset
Keywords: 10 100,,10 100 ethernet,10 100 ethernet drivers,device drivers,ethernet card driver,ethernet card drivers,ethernet controller driver,ethernet controller drivers,ethernet driver,ethernet drivers,fast ethernet,intex driver,lan 8139,lan adapter,lan driver,lan drivers,mtd,myson,network adapter driver,network adapter drivers,network card,network card driver,network card drivers,network controller driver,network driver,network drivers,nic drivers,pci ethernet drivers,realtek drivers,realtek rtl8139 lan,rtl8139 drivers,rtl8139c drivers,rtl8139d drivers,tech com,techcom,zebronic,zebronics
Myson MTD80X LAN/NIC Drivers for Windows/Linux/OS2
Myson Century Inc (http://www.myson.com.tw) manufactured a LAN/NIC Card chipset named MTD80X which many low-quality manufacturers like Frontech, Intex, or Techcom used in their LAN/NIC Cards sold in India…
Now the biggest problem is, there isnt a proper driver available for download from the manufacturers site.. They dont have that chipset listed in the products…
Hence, i decided to upload the rare drivers out here for you all..
Original Diskette Drivers for MTD80X (All Windows, Linux & OS2): Myson_NIC_Windows.zip
Another version of drivers available are faked someone…for getting them detected as Realtek RTL8139 LAN/NIC Card in Windows..but the chipset is MTD80X (Windows Only)
MTD80X_RTL8139_Fake.zip
Hope these drivers help others..
Both are working fine..except in Windows XP with SP2..
The Faked ones only list the LAN/NIC card as Realtek RTL8139 in Device Manager..no other driver change..
Keywords: 10 100,,10 100 ethernet,10 100 ethernet drivers,device drivers,ethernet card driver,ethernet card drivers,ethernet controller driver,ethernet controller drivers,ethernet driver,ethernet drivers,fast ethernet,intex driver,lan 8139,lan adapter,lan driver,lan drivers,mtd,myson,network adapter driver,network adapter drivers,network card,network card driver,network card drivers,network controller driver,network driver,network drivers,nic drivers,pci ethernet drivers,realtek drivers,realtek rtl8139 lan,rtl8139 drivers,rtl8139c drivers,rtl8139d drivers,tech com,techcom,zebronic,zebronics
Guide: Windows Xp Home / Pro Sp2 Visual Theme Hack
DISCLAIMER: Follow this guide at your OWN risk! This may render your system unbootable or permanently damaged.
This procedure involves replacing your existing Windows Visual Theme DLL file(uxtheme.dll) to its hacked version so that it can allow NON-SIGNED Visual Themes i.e. Not Officially distributed by Microsoft.
Before we proceed further… do a system check!No SHELL Replacement Programs like WindowBlinds or TalismanNo previous attempts to hack the Visual Theme DLL OS: Windows XP Home/Pro with Service Pack 2Browse to %Systemroot%\WINDOWS\System32\Find uxtheme.dll file and right click>Properties>Version TabThe File version should be: 6.0.2900.2180 (Check Screenshot)
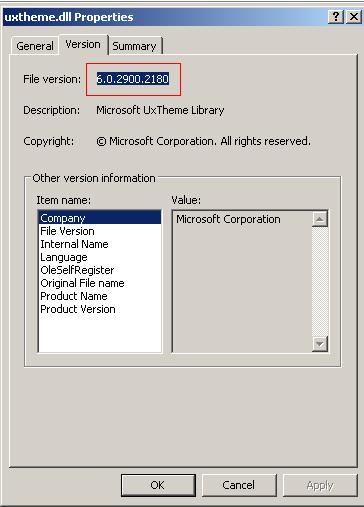
If you dont have this File Version listed for your uxtheme.dll file, then please stop here and do not follow this guide further as it would be unfit for your system.
BACKUP: Now make a folder somewhere and copy your current uxtheme.dll file, just incase you want to have some chances of recovering a failed hack!
DownloadsOnce its confirmed that your system is ready for the hack, download a very small program called ‘Replacer’ from the given URL.Replacer is fav program of many system hacker as it allows you to replace a DLL file while your WINDOWS is UP and RUNNING!
Generally, you cant replace a System’s DLL when your WINDOWS System is ON!So get the REPLACER(10KB)! http://www3.telus.net/_/replacer/Replacer.zip
Another file that you need is the hacked version of original uxtheme.dll(112KB) file!Get that from: http://www.neowin.net/forum/index.php?act=Attach&type=post&id=122794
After downloading this file, unzip and do the same ‘File Version’ check as we did for the original uxtheme.dll
STEPS Ok.. now all set, lets began to replace the DLL File!
1) Unzip REPLACER Double Click: Replacer.cmd file(NOTE: Those using Microsoft Antispyware BETA, may get a popup asking permission for running the script… Please select ‘ALLOW’)At IDLE Stage, your Replacer.cmd looks like in screenshot…
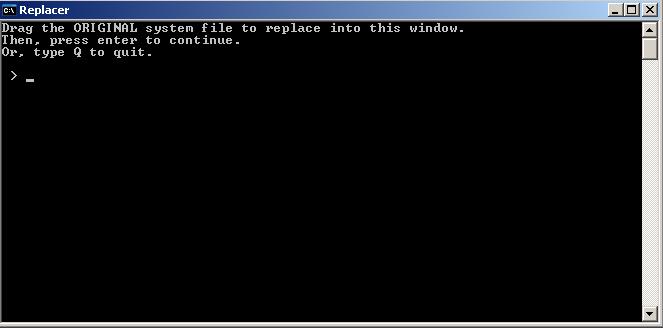
2)Now as the screen text says.. you have to DRAG your ORIGINAL theme file to the Replacer Window! (i.e. Drag your uxtheme.dll file from %Systemroot%\WINDOWS\System32\) When you do this, the Replacer Window would show the path to that file! (Check screenshot) Now press ENTER

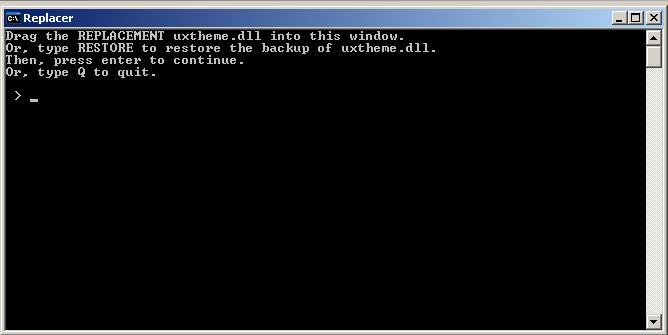
3)The next window would ask you to drag the replacement uxtheme.dll file, i.e. the hacked dll file which you downloaded! (Check: Screenshot)Drag that from the place where you UNZIPPED the file..as earlier it would again show you the path from where you dragged! (Check: Screenshot)
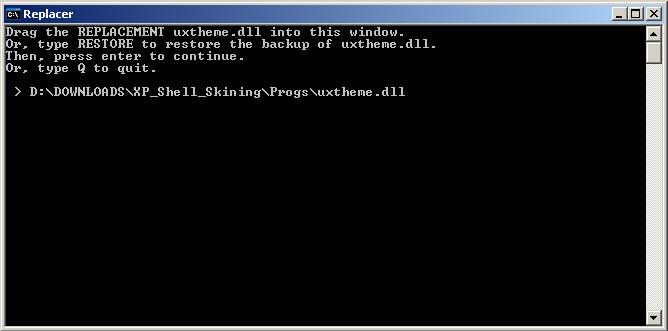
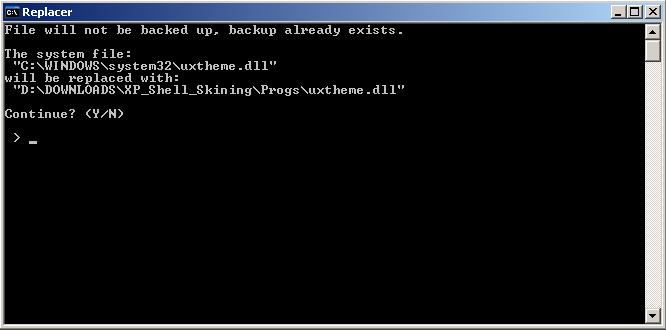
4)It would show you both the paths of Original & Replacement File and ask whether to Continue replacement or not? (y/n) (Check Screenshot)Generally, if you followed my earlier steps without any error.. you can blindly type ‘y’ and press ENTERAs soon as you confirm, it would start the process of REPLACEMENT and it would say:
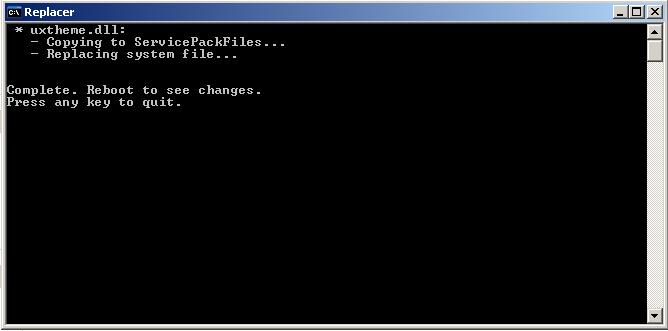
* uxtheme.dll-
Copying to ServicePackFiles…
-Replacing system file…
Complete. Reboot to see changes.Press any key to quit.(Check Screenshot)
5)Now as it says, “press any key to quit”, that Replacer Program and Manually RESTART the system and logon!If you are able to Login or rather see your DESKTOP then you have done everything correctly!
6)Its time for adding VISUAL THEMES to your system now!My two favs are:Windows Vista(1,519KB): http://www.deviantart.com/view/22150948/Fedora Core(Blue_Curve_4.3)(188KB): http://www.deviantart.com/deviation/4279121/
Uncompress the file and copy the Folder containing “Windows Visual Style File” type to: %Systemroot%\WINDOWS\Resources\Themes\i.e. for example, if you have going for the Windows Vista, there is a folder named “Vista”, copy that entire folder to Themes folder or if you have got the Blue Curve(Fedora Look), copy the folder ‘Bluecurve 4’ & ‘Thincurve 4’ to the Themes directoryNow, its the time to DISCO
7)Reach the APPEARANCE Tab…from where you used to shuffle for Windows Classic or Windows XP Look…There you would find Vista Listed, select it and Press APPLY! (Check Screenshot)

Now, for the first time, that Please Wait would take quite a time to GO.. dont PANIC!But in subsequent apply of any other new theme would be FASTER!
8)So thats the way to go…Now any new Visual Themes you download, are to be unzipped, and the respective folder to be copied to the Themes folder and its done!
Visual Themes Repository: http://www.neowin.net/forum/index.php?showforum=36http://www.deviantart.com/
Notes: %Systemroot% corresponds to the Partition where your Windows XP is installed! e.g.(C:\ or D:\ …)
DISCLAIMER:Once again, i am warning you… if you dont know how to recover from a system crash or your PC is under warranty, dont go for this procedure!
